(I was going to call this article
“Prints of
Darkness”, but good sense prevailed…)
The subject is low-light photography. This doesn’t mean that it’s time
to pop up the flash and fire away, but that it’s time to get out the
tripod or brace against a wall and fiddle with all those settings that
you were wondering about! Low-light photography can be fun and allow for
some real creativity. It can be as easy as setting your Point & Shoot on
the edge of a table with the self-timer on or require hundreds of shots
while you practice panning.
Some of the following is covered in my other articles but is included
here to keep you from having to jump around looking for clarification.
Light as your camera knows it
Available light is measured in a unit called an Exposure Value or EV. The
EV scale runs both ways from zero and the meaningful range is from about
EV-6 to EV20 with every whole number increase or decrease representing
twice or half the amount of available light (a room that measures EV6 is
twice as bright as one that measures EV5). The metering range that most
cameras will meter accurately runs from about EV2 to EV16 with some
DSLRs covering EV-2 to EV20. For reference, here are some real-world
examples:
EV-6 - Scenery away from city lights full
starlight
EV-2 - Light colored scenery under full moonlight
EV1 - Distant buildings/skyline
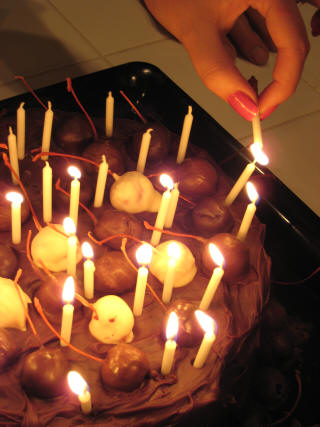
EV4 - Streets with street lamps – people near a bright birthday cake
EV5-EV6 - Home interiors with normal lighting – bright campfire
EV8 - Well-lit football or baseball stadium
EV11 - People or objects in open shade on a bright day
EV14 - Photographing the moon at night with a telephoto (it's daytime on
the moon)
EV15 - Subjects in high, direct or hazy sun.
EV16 - Sunlit snow or bright sand
Keep in mind that while a camera may only be able to meter down to EV2,
there’s nothing stopping you from taking pictures in much lower light if
you understand exposure. Since EV numbers only represent the amount of
light available, we need to understand how the various settings on your
camera translate that available light into a properly exposed image.
Exposure
The two factors that determine how much light reaches your sensor (or
film) are aperture and shutter speed. The factor that determines how
quickly your camera absorbs that light is the ISO rating of your sensor
(or film). These three factors are used to adjust your camera to the
level of light illuminating your subject (EV). Let’s look at each of
these factors individually before we start mixing them.
Aperture
An aperture is a hole. It doesn’t get any simpler than that. It can,
however, get a bit more complicated. On a lens designation, the aperture
range is indicated by the letter "
f"
(Times New Roman, italic). A 50mm
f/1.4 - 22 lens has a focal length of
50mm (see the section on focal length in my article on
Adding
Lenses), a maximum aperture of
f/1.4 and a minimum aperture of
f/22.
Uh oh…here’s the first terminology hurdle. The maximum number is smaller
than the minimum number. Why?
The lens
f-number (usually called
an
f-stop) is a ratio determined by dividing the diameter of the hole
(aperture) in the lens body that lets light in by the focal length of
the lens. A 50mm lens with a 25mm aperture would have an
f-number of
2.0. The larger the aperture in relation to the focal length, the more
light can pass through the lens and strike the sensor or film. Lenses
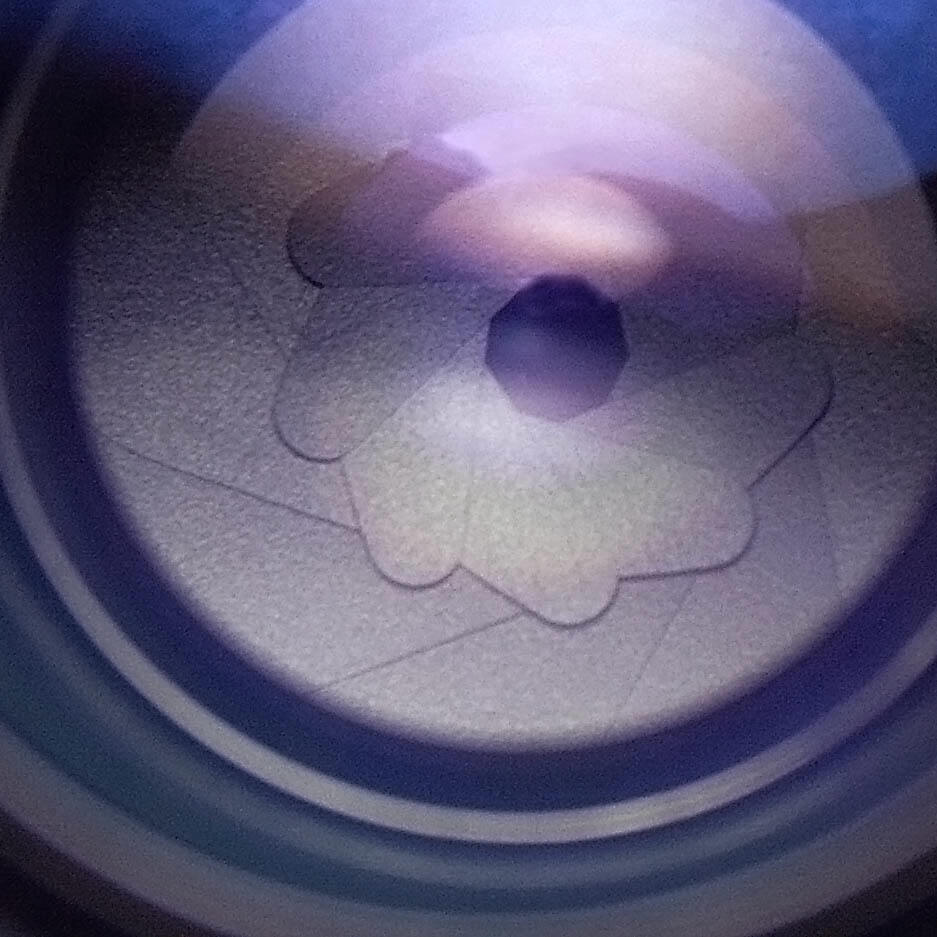
have variable apertures that are adjusted by a diaphragm mechanism (see
picture). Standard
f-stops are
1.0, 1.4, 2.0, 2.8, 4.0, 5.6, 8.0, 11, 16, 22
and 32. Because each stop number represents a ratio that includes a
diameter, each
f-stop numerical increase (2.8 to 4.0 for instance)
represents a reduction in the size of the aperture and cuts the amount
of light reaching the sensor in half. Each
f-stop numerical decrease
doubles the amount of light reaching the sensor. A step up or down that
halves or doubles the exposure is called a "full" stop. Many cameras
allow aperture to be adjusted in increments less than a full stop
(i.e.
f/6.3 is a half stop between
f/5.6 and
f/8). In case
you were wondering, it's called a "stop" because the manual aperture
rings on lenses have detents, or a "stop" that hold the ring at the
chosen value.
Note: Zoom lenses
will often have the f-range indicated by f/4.5- class="aperture-s">f/6.3 to f/16-f/22. This
means that while the maximum aperture changes as you zoom. At 70mm it will
be f/4.5, but since the diameter of
the actual aperture doesn't change, the aperture/focal-length ratio does,
making it only f/6.3 at 300mm. Same with the minimum aperture on some models.
Now that we know what determines how much light reaches the sensor,
let’s see what determines how long the sensor is exposed to the light.
Shutter Speed
The shutter on a camera is usually a light series of
blades that move very quickly to open, which exposes the sensor or film
to light, then closing to stop the exposure. When I say quick, I mean
quick. Even Point & Shoot (P&S from now on) cameras usually have a top
shutter speed of 1/1000s ("s" = second) and the higher-end DSLRs can
expose for as little as 1/8000s (the film-based Minolta Maxxum 9 could
do 1/12000s!) On the other end, P&S camera are often limited to a
maximum exposure of 4 to 15 seconds with DSLRs mostly able to do 30
seconds. Some P&S and most DSLR cameras have a “B” or “Bulb” mode that
locks the shutter open for as long as you hold the shutter button down
for very long exposures. Note: It’s called bulb mode because in the days
of real flash bulbs, you would lock the shutter open in a dim
environment, fire off several flashbulbs to light the scene and then
close the shutter. Standard shutter speeds in the days of mechanical
shutters were typically 1s, ½s, ¼s, 1/8s, 1/15s, 1/30s, 1/60s, 1/125s,
1/250s, 1/500s and 1/1000s. Since each step on the scale allowed the
film to be exposed for half or twice as long (this is also considered a
full stop, just like the f-number), the values have carried over to
remain as standard settings in the current era of digital sensors and
incredibly accurate electronic shutters. (You may set your dials or menu
to
f/8 at 1/500s, but the actual shutter speed could be 1/462s). Now, we
look at the final factor in exposure.
ISO Sensitivity
Back when
photography was a new toy, photographers would prepare a light-sensitive
gel and spread it on a flat glass plate (appropriately called a
"wet-plate"). They would then test it to see how long it took to
properly expose it. This often had to be done with each batch and was a
bit of a pain. With the advent celluloid roll film and mass-produced
cameras making photography available to most people, the need arose for
some way to know how to properly expose store-bought film without a lot
of testing. Eventually the American Standards Association (ASA)
developed a sensitivity scale that all film makers could use, assuring
that any film purchased with an ASA rating of 100 would perform like any
other ASA100 film. In Europe, they used the German DIN standard. In the
late-eighties (1987?), the ASA standard was adopted by the ISO
organization (though the group is officially named the
International Organization of Standardization) and the rating was
changed to ISO for everyone. Modern digital sensors rate their
sensitivity using the ISO film standard, so ISO100 on a DSLR will expose
like ISO100 film. Since film had standard values like ISO25, 50, 64, 80,
100, 160, 200, 400, 800, 1000 and higher, digital cameras followed ISO's
lead and set the standard sensitivity level steps at 100, 200, 400, 800,
1600, etc. with each step increase or decrease doubling or halving the
sensitivity of the previous one (again, equaling a full stop). Sensors,
unlike film, aren't limited to a single ISO sensitivity level. A sensor
that normally has an ISO100 sensitivity can be set to ISO200 sensitivity
and will capture the same amount of light in half the time. (As with the
shutter, the ISO is electronically controlled and some cameras can be
set at values between the standard settings.) This particular doubling
comes with a price. In film, doubling the speed meant making the
light-sensitive crystals larger to increase sensitivity. By the time you
got to ISO800 or so, the pictures were showing noticeable graininess. At
ISO3200, they looked like they were printed on 60-grit sandpaper. The
same is true for digital sensors. Most have a base ISO of 100-200 and
for higher sensitivity, the signal from the sensor needs to be
amplified. Just like an audio signal, the more you amplify, the less
true the signal becomes. The result is “digital noise”, which manifests
as graininess similar to film grain. Modern DSLRs can produce excellent
images at ISO speeds up to ISO25600 and above. Because of their smaller,
more densely-packed sensors, P&S cameras and smartphones begin to be affected by noise
at lower sensitivities, much the same as film cameras. Good photos at
ISO800 are rare for most of them. Not to worry! The best quality for
either is at or near the base ISO, so shooting at the lowest ISO
possible is always a good idea. While you can use ISO3200 to shoot in
low light situations, you most certainly don’t need to. It’s time to assemble the
pieces.
The Trinity of Exposure
Back before we had evaluative,
multi-segment metering (or whatever buzz-words your camera maker uses to
tell you how smart your camera is) and tiny supercomputers in our
cameras, people who couldn't afford a light meter often had to use
rule-of-thumb to get the correct exposure. One such rule was the “Sunny
16” rule. It went like this; if your subject was in the open on a sunny
day (EV15) you shoot at
f/16 with the shutter speed set to the
reciprocal of the speed of your film. If you were using ISO100 slide
film, your setting would be
f/16 at 1/125s (the closest standard setting
to 100) and you could expect a reasonably good exposure.
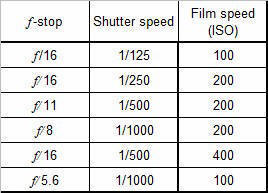
If you change
any of the three values, you must change at least one of the others to
get the same exposure. The chart illustrates this by shifting the
exposure components up and down. Keep in mind that all of the settings
listed in the chart will result in the same exposure. For the P&S owners
reading this, don’t worry that your camera’s aperture only goes down
to
f/8 or so. The numbers in the chart were used for illustration (and
because the math was easy.)
So, let’s start figuring out where we need
to go for our low-light adventure.
Sooooo…Slooooow!
Note: the following
math is for illustrative purposes to highlight the concept of exposure
and how each of the three components relate to each other. Thanks to the
miracle of modern cameras, you will never have to do any of this in the
field, just read the settings!
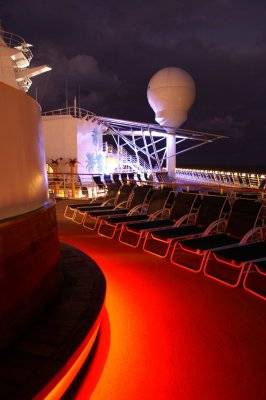
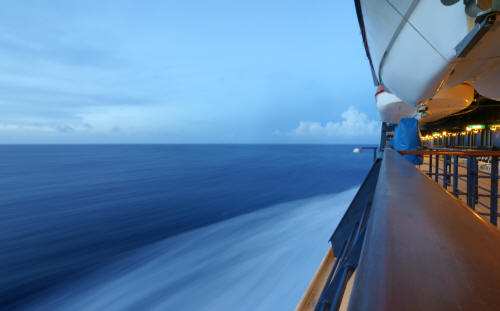
On a sunny day,
f/16 at 1/125s using
ISO100 works fine. Let’s drop to EV6 for the interior of a cruise ship
promenade. We’ll assume
f/4 for a maximum aperture since almost all
cameras, whether DSLR or P&S, have lenses that will go there (many go
another stop to
f/2.8). Since we are still shooting at ISO100 and
dropping to EV6, we need to open up that aperture and slow down the
shutter. Since EV6 is 9 stops or 512 times dimmer than EV15 (15 – 6 = 9,
2
9 = 512), we need to make a significant change. Opening up from
f/16
to
f/4 only lets 16 times the light in (4 stops, 2
4 = 16), so we need to
slow the shutter down by 5 stops to reach the proper exposure (5 stops
2
5 = 32, 32 x 16 = 512!). Here's a little illustration without the
exponents:

What we ended up with is 1/4s at
f/4. With a shutter speed
that slow, is it any wonder low-light photos often come out blurry?
So, what do we do?
If you shift the ISO up to ISO400 (4 x 100), you need to
divide the shutter speed by 4 (1/4 / 4 = 1/16) and set it at 1/15s
(closest standard, remember?) 1/15s with a modern image-stabilized DSLR
or P&S can do 1/15s with a little practice and a steady hand. There are
many proven methods for improving low-light success. Here are some
methods that have worked for me:
Note: Even if you are a rock-solid shooter and have the best
stabilization possible, subject motion will show up in a longer exposure
no matter what.
Basics: If you are hand-holding, turn
on the camera or lens stabilization if it's available. Regardless of
stabilization, hold your arms in against your body, but not so tightly
that it makes you tremble. If you are using a camera with a viewfinder,
press it against your face to steady it, but again, not too tightly.
Sniper-style:Lean against a wall or doorway
or some other solid support if one is available. Press
the shutter half-way down to pre-focus. Breathe slowly and stop
breathing just before pressing it the rest of the way. When you press
it, squeeze the button slowly until it trips and don't let up until the
shot is over. Pressing the shutter down too hard will move the camera
downward and letting go while the shutter is open will cause the lens to
move upwards. You need to be aware of and eliminate all sources of
motion.
Continuous or "burst" mode: Not just for sports and action! Set
the camera on “Continuous” shooting mode, keep as still as you can, and
then hold the shutter down for 4 or 5 shots. Your chances of getting a
sharp one out of five is pretty good. Just delete the ones that didn’t
come out.
All these methods pale in comparison to the effectiveness of
removing the human element from the motion equation. For that you need
support other than yourself.
Tripod or monopod: These are the most
obvious. A good travel tripod or monopod is invaluable for low-light
work. If you use a compact, a Joby Gorilla-pod is a small but effective
option. There are even little devices that screw into the tripod socket
and clamp on the edge of a table or fit on a beer or soda bottle,
turning it into a camera support.
Note: If your camera has
stabilization, most manuals will tell you to turn it off when the camera
is on a tripod. Stabilizing systems can cause motion-blurring by trying
to correct for motion that isn't really there.
Table-Pod: Set the camera
on the edge of a table, bench or planter and set the self timer. Compose
the shot (I've used lens caps, coins, napkins and other bits to prop and
tilt the camera for composition) and start the timer. When it goes off,
you won’t be touching the camera, so it won’t be affected by any
vibration from your hands and you will get a sharp image.
Drink-pod: Set
the camera across the top of a drinking glass or bottle setting on a table. It
raises the point of view above the table, Use the self-timer as above. I
hope I don't have to mention that you should not try this if the glass
is full and nearly as wide as your camera!
Rail-Pod:If a safe stable
spot for your camera isn’t available, you can hold it tight against a
railing and trigger the shutter directly or with the timer. Trash cans,
barrels, and cars offer impromptu support as well.
Gaffer's-Pod:
Gaffer's tape is like high quality duct tape, but can be applied, peeled
and re-applied without leaving a residue. It's main use it to control
wiring and to rig lights and reflectors on movie sets, but I always
carry a small roll in my camera bag. You can use it to tape your camera
to a doorway, chair-back, tree-limb or just about anything. A roll of
Gaffer's tape and the self-timer turns anything into a
(fill-in-the-blank)-pod!
Conditions to watch for:
Light color:
Fluorescent and incandescent interior lighting can vary greatly and Auto
white-balance struggles with making them work. Most cameras let you take
the white-balance off of auto and use tungsten (incandescent) or
fluorescent presets. If you have a lot of mixed light and just can't
correct for it, black & white is always an option.
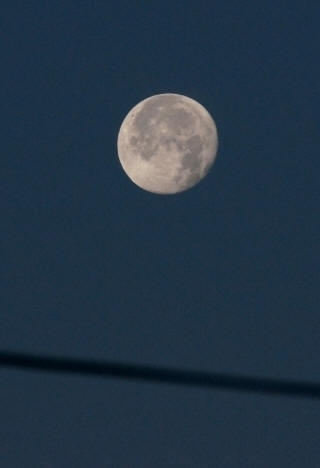
The Moon: Dark sky,
middle of the night, and you shoot the moon using the "sunny 16" rule!?!
The moon is not sharing the night with you. You are seeing it's day side
and it's reflecting sunlight like a volleyball on the beach at noon!
When in doubt, bracket: Bracketing means that you take a series of
pictures of the same subject with exposures adjusted higher and lower
(using the little +/- button that you were wondering about) than what
your metering suggests. This is handy in tricky lighting, greatly
increasing your chances of a good exposure. BTW, some cameras let you
bracket white-balance as well.
Night-shot mode: Most cameras have a
night-shot mode that exposes for the dark scene and then pops the flash
to illuminate people or objects in the foreground. Remind the people not
to move until you tell them to since the camera may be taking a full
second exposure before or after the flash.
Some Examples:
Hand-held
Stabilized DSLR
1/2s – f/3.5 – ISO400
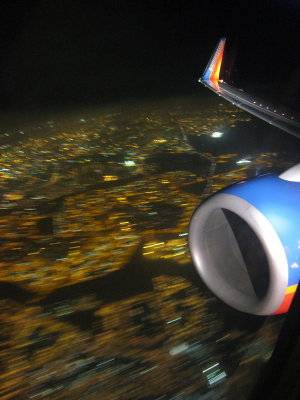
Compact on continuous, braced on window frame. No flash...the engine was illuminated by the landing lights.
1s – f/2.8 – ISO100
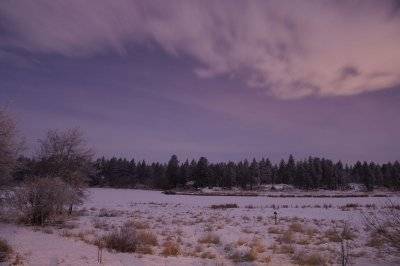
8:30 PM in December –
full dark, slight moon. Trees were barely visible with naked eye!
DSLR on tripod
30s – f/4 – ISO200
Fireworks after dark
DSLR on tripod
10s – f/8 – ISO100
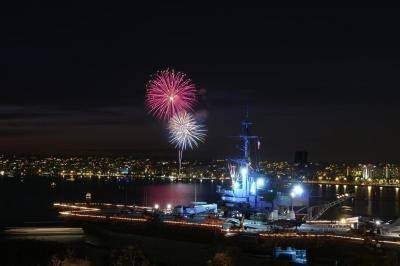
Night-shot mode.
Sony DSLR hand-held with pop-up flash
1/6s – f/4 – ISO800

The moon needs to be exposed as if it were in daylight. Moon before sunrise.
Sony DSLR - tripod & telephoto
1/100s – f/8 – ISO100
Dim restaurant interior.
Compact on table edge with self-timer
1/2s – f/2.8 – ISO100
As you can see, you don't need to use high-end equipment to get interesting images
with a little practice and ingenuity.
Let’s look at some other uses for low-light photography. Here are some
more examples with exposure information:
Add surrealism to ordinary scenes. Like this thermonuclear Christmas tree.
Minolta digicam on a tripod.
10s – f/4.5 – ISO100

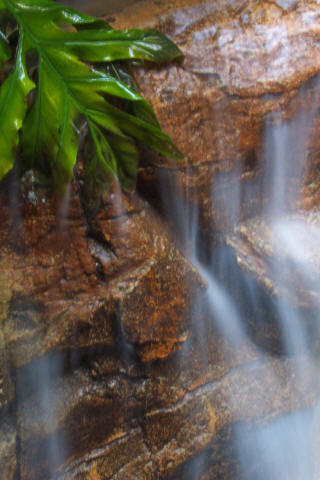
Turn flowing water into a veil. This is very good with fountains too.
Compact camera braced on railing.
1.6s – f/16 – ISO200
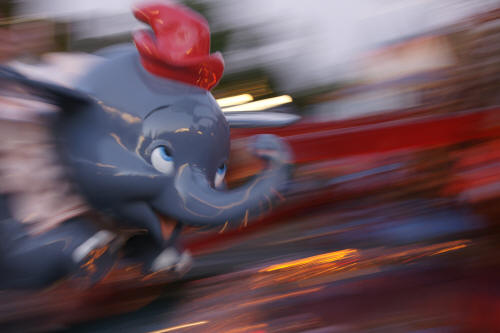
Follow a moving object (panning) to impart a sense of motion. This was shot well after sunset.
Sony DSLR. Stabilization turned off.
1/8s – f/5 – ISO400
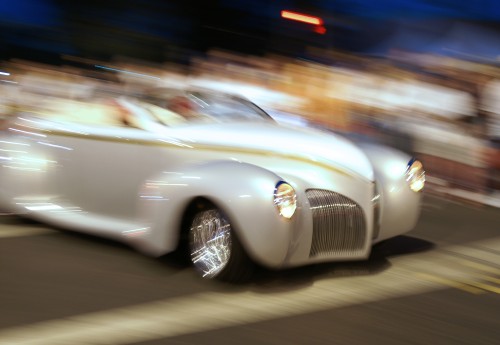
Didn't really need another panning shot, but I really like this one!
Under streetlights, Minolta DSLR.
1/2s – f/2.8 – ISO200
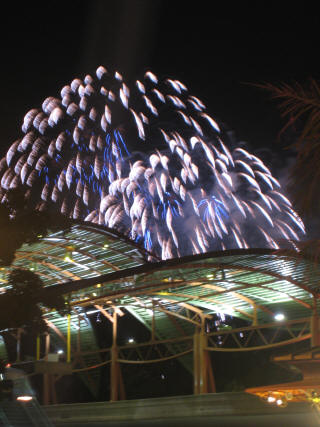
Emergency fireworks shot at Disneyland.
Hand-held compact using continuous shooting mode.
1s – f/5.6 – ISO100
Show motion by making your own low light with a small aperture, low ISO and a polarizer.
Minolta digicam, hand-held.
1/15s – f/11 – ISO64

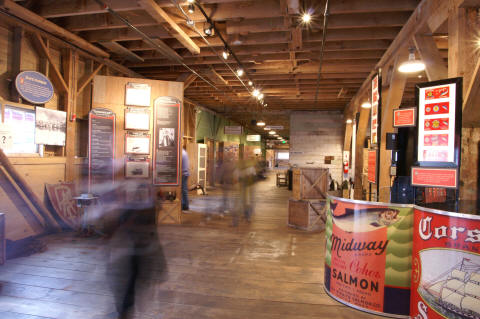
Make people disappear from public areas. Ten seconds will remove all but the laziest people from a mall or promenade.
Minolta DSLR, braced on a barrel.
2.5s – f/16 – ISO400
Un-corrected natural light can add warmth. Low room light. Compact braced on chair-back.
1/20s – f/4 – ISO100
Play with your food!
Compact propped on the table.
1/5s – f/2.8 – ISO100
Shots from a moving vehicle in low light can produce interesting effects.
Late twilight. Sony DSLR, braced on railing.
4s – f/16 – ISO100
Conclusion
Now that you have some ideas brewing in your head, go out and try them
out. The only real expense is your time and while technology has added a
lot of smarts into our cameras, it still hasn't replaced practice as the
single greatest learning tool available to photographers.
Happy shooting!
Dave