
People, Places & Things
Photography for the love of it...

How much memory to take on a trip...
...is a decision that all digital
photographers face at some point, pro and amateur alike. If you're a pro
and determine through experience that you need more memory than you
already have, the answer is to buy more of your preferred memory cards
and bake some or all of the price into what you charge your client. If
you're a traveler on a budget and new to the world of digital
photography beyond what your phone covers, the answer isn't that simple.
You need to estimate how much you need with no frame of reference other
that the somewhat misleading charts offered on package labeling. Read on
and I’ll try to help.
Quality and resolution:
How many pictures can you put on a card? Obviously, one factor is the
size of the card but you still need to know how large the image files
will be to get a decent estimate. A common mistake digital newbies would
make back in the early days is to read the manual and without any clue
as to what the numbers meant, they would say, "The manual says that on
the “S” setting I can fit 22,000 pictures on one 4GB card!” While that
might be technically true for 640x480 VGA images, the post-vacation
results would have comments more like, “This camera sucks! The pictures
are all fuzzy when I have them printed!” I’ll try to explain the how and
why of resolution and image quality settings and give my humble
suggestions on how to make an informed decision on what's best for you.
In a digital camera there are two major factors that affect quality.
These are image size (resolution) and compression (quality).
Image Size (resolution):
Digital cameras capture light on a sensor made up of tiny light
sensitive dots that translate into pixels on the final image. Simply
put, the resolution of a camera sensor is the number of dots, or pixels,
side to side multiplied by the number of pixels up and down. If that
number equals a million, the sensor’s resolution is one megapixel (MP).
Marketing departments have made the megapixel a household word and it is
the measuring stick that we now use to measure the ability of a camera
to capture detail. More dots = more resolution = more detail. With some
exceptions, this holds true. (You may want to read my article on camera
parts for more detail.)
Let’s turn those dots, or pixels into something easy to relate to. The
resolution of your
personal viewing device is a good place to start since
you will probably use it the most to view your pictures and their
resolution is also measured in MP. Most newer laptop screens and PC
monitors under about 24” have an HD resolution of 1920 x 1200 (2.3 MP).
The much-lauded Retina display on the iPads is 2048 x 1536 (3.15 MP). If
you are lucky enough to own one of the newer hi-resolution 27" or larger
graphics monitors, 2560 x 1600 is common with 3840 x 2160 4K UHD resolution (8.3MP)
also becoming
mainstream. Why on earth would you ever need more than 10MP?
Prints are another common destination for digital photos. Regardless
of the mechanical resolution, most printers work with files that are
sized to print at 240-300 DPI, or Dots Per Inch (a leftover term from
offset printing…the use of computers makes PPI or Pixels Per Inch a more
common reference nowadays.) At 300 PPI, the individual dots on the print
are supposed to be beyond the resolution of the unaided human eye, so
prints made at this resolution appear as smooth, “photo quality”
pictures. What this means is a 4” x 6” standard print needs to be 1,200
pixels high by 1800 pixels (2.16 MP) to appear clear and sharp like a
print made from film. An 8” x 10” print needs to be 2,400 high by 3,000
wide (7.2 MP). A 16” x 20” is 28.8MP and a 20 x 24” is 43.2MP. Now we
have some reference points and begin to see why 10MP or more can come in
handy.
Just to clarify, you don’t need a 1:1 ratio between file size and
print size to get a good print. I have several 24” x 36” metal prints
from a 24MP original and even a 40” x 60” landscape from a 12MP
original. Images can be resized quite a bit using software like
Photoshop or the output driver on sophisticated printers before the
clarity starts to suffer. Even then a little loss of clarity doesn’t
really hurt. A 40” x 60” image isn’t meant to be viewed from two feet
away.
Quality
No, the quality setting in the menu doesn’t mean you can set your camera to only
take and keep good pictures...yet
The “quality” of a digital image refers to how much the software in the
camera compresses the image before it stores it. The image format used
by virtually every digital camera today is JPEG (pronounced jay-peg -
your picture files will have a .jpg extension). JPEG originated as an
ISO standard (International Organization for Standardization) for the
compression of digital images in 1990 and was written by the Joint
Photographic Experts Group, hence the name. The JPEG in use today is not
quite the same, but the name stuck. I guess it was easy to pronounce.
To understand image compression, I suppose we will have to put on our
propeller hats and take a quick look at how digital images are stored.
Each pixel is represented in an image file as a number that tells the
computer what color it is and how bright it should be. In an
un-compressed image like a bitmap (.bmp) or a TIFF (.tif), each pixel
has a place and is reproduced whenever the file is opened. The code is
written to the file as “pixel code” x “number of pixels”, so all 10 MP
image files, for instance, will be exactly the same size. This will
become relevant in a moment.
Each pixel is encoded as a numerical value. The value for a reading
of a particular shade of red at x brightness will be the same no matter
what camera it was taken on.
In a simple, understandable world, bitmap file code would go like
this:
Row 1, Pixel 1 = 234; Row 1, Pixel 2 = 236; Row 1, Pixel 3 = 236; Row 1,
Pixel 4 = 245;…
Row 2, Pixel 1 = 234; Row 2, Pixel 2 = 234; Row 2, Pixel 3 = 236; Row 2,
Pixel 4 = 245;…
Etc., etc, etc.
In a JPEG, the encoding software saves space by combining similar
pixels together and eliminating the need for coding each pixel
separately. Like this:
Row 1, Pixel 1 = 234; Row 1, Pixel 2-3 = 236; Row 1, Pixel 4 = 245;…
Row 2, Pixel 1-2 = 234; Row 2, Pixel 3 = 236; Row 2, Pixel 4 = 245;…
Etc. x 3…
As you can see, even in my tinker-toy representation of the code, the
system saves space, a lot of it! Woo-hoo…something for nothing! Well,
not quite. The example above only combines identical pixels (lossless).
In the real world of compression, the software averages the values of
similar pixels to save even more space (lossy).
Sort of like this:
Row 1, Pixel 1-3 = 235; Row 1, Pixel 4 = 245;…
Row 2, Pixel 1-3 = 235; Row 2, Pixel 4 = 245;…
Etc. x 3…
When the file is opened after compression, pixels 1-3 which were
averaged to a middle value are all displayed as that average value,
losing their original value. This sounds really bad using my little
example, but in practice, an image file supports millions of color
levels and the combination of dozens of levels is usually undetectable.
The exception to this happens when you edit an original file and re-save
it several times. Opening and closing to view a JPEG file does nothing,
so don't worry about killing your pictures by looking at them. If,
however, you edit and save the file, it will be recompressed and data
will be lost each time. After several edits and saves, even a high
quality JPEG can exhibit degradation. I always edit a copy even when
using image processing software like Photoshop which has an option for
lossless compression. Another seeming oddity of compression is that
images with a lot of similar adjacent areas, such as a scene with a
solid color background will compress more than an image with a wide
variety of colors and details. That's why your frame counter may show 50
shots left and you get 35 -70 more. Your camera isn't stupid, it is just
averaging your file sizes and giving you a guide to go by.
The reason you have different quality settings is so you can decide
how much image quality you want to trade for file size reduction. The
higher the quality setting, the more of the original image info is
retained and the larger the file. As you reduce the quality, less and
less of the original image info is retained and the smaller the file
gets.
For maximum compression effect in the following example, I used a small section of a photo taken with a 6MP
DSLR camera and saved as the highest quality JPEG. The cut-out was saved
at highest, medium and lowest quality settings in Photoshop to
illustrate the effect of compression.
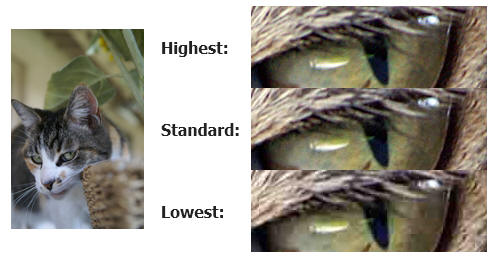
Hmmm… not much difference is there? Lets look really close, as if you wanted to make a 11 x 14 enlargement from a 5MP original:
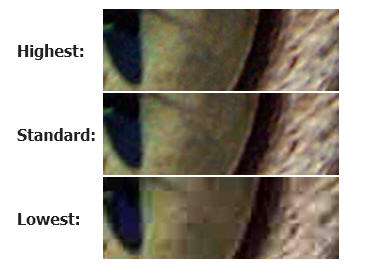
At this point, the image degradation becomes noticeable. At the
lowest setting, the colors are showing blotchiness, there's noticeable
pixelization and diagonal lines are becoming jagged. That means that
there is, after all, a moral to this story...
The Scenario:
You have purchased a 24MP digital camera and are ready to travel, see
the world, and bring it all back home to show friends and family. You
want to make a DVD slide show of your best shots and some prints for the
scrapbook. To do this you need to take enough memory to store all those once-in-a-lifetime shots. Your camera is a good one
that has many menu options for setting resolution (image size) and
quality (compression).
The Question: “How much memory should I bring?”
The Answer: “It depends…” With all the variables in camera’s image
processors and though JPEG is a standard, the amount of compression
determined by each manufacturer’s “standards” can vary considerably.
This means there really aren’t any reliable constants you can go by. You
really do have to learn a little about your camera before you can guess
at an answer.
Resolution settings:
The largest file your camera will record; ALWAYS! If your camera is
24MP, shoot at 24MP. If you think that a 12MP setting is good enough,
then you should have bought a used 12MP camera and saved some money. You can
reduce the size of a 24 MP picture to 640 x 480 to e-mail it but
enlarging a 640 x 480 image to print a 5 x 7 will always look bad. (If
you're thinking that the good guys on CSI can really get portrait
quality images of a suspect from a convenience store security camera,
then I have a whole list of things that I would like to sell you!)
Making a small image bigger always loses quality. As mentioned before,
loss of quality may be acceptably small, but enlarging will always mean
a loss.
Quality settings:
As you can see in the examples above, the difference between the highest
and standard quality is not that great. In almost all cases, a print
made at the highest quality image setting in most cameras will be
virtually indistinguishable from a print made from a standard quality
image. Unless you are a working professional who doesn't use RAW* and
may need to make enlargements of any picture at any time, standard
compression is very useable and will save a lot of space. That is not to
say to never use the highest quality. Personally, I always use the
highest setting. If you can afford the space, it is the best choice.
Remember, you can always re-compress files to save space where the
highest quality isn't needed, but it is a one-way-street! Once
compressed, the image data that was discarded to achieve greater
compression is gone forever! If you never print and only view your
images on screens, choosing a lower quality setting can save some space
but considering that memory is so darned cheap these days, it’s hard to
justify.
*Refer to my article on RAW vs. JPEG for detail on RAW.
Dave